Bootstrap Popover Example
Intro
The versions
Bootstrap is one of the most useful and free open-source platforms to develop websites. The latest version of the Bootstrap platform is known as the Bootstrap 4.
Usefulness of the Bootstrap 4
By using Bootstrap 4 you may develop your web site now much faster than ever. As well, it is reasonably truly much easier to use Bootstrap to build your website than various other systems. Together with the integration of HTML, CSS, and JS framework it is just one of the most popular systems for website development.
Some functions and tricks in Bootstrap 4
Some of the best functions of the Bootstrap 4 include:
• An improvised grid system which allows the user to make mobile device helpful web sites along with a fair level of comfort.
• A number of utility guidance sets have been involved in the Bootstrap 4 to help with uncomplicated learning for beginners in the business of website development.
Factors to notice
Step 2: Rewrite your article by highlighting words and phrases.
Along with the launch of the new Bootstrap 4, the connections to the earlier version, Bootstrap 3 have not been absolutely renounced. The programmers have ensured that the Bootstrap 3 does get regular improve and problem resolve alongside renovations. It will be accomplished even after the ultimate produce of the Bootstrap 4. Bootstrap 3 have not been completely cut off. The developers have certainly made sure that the Bootstrap 3 does get regular upgrade and bug fixes along with improvements.
Differences about Bootstrap 4 and Bootstrap 3
• The assistance for many different browsers together with managing systems has been provided in the Bootstrap 4
• The global size of the font is improved for convenient browsing and web-site advancement practical experience
• The renaming of a variety of components has been completed to ensure a quicker and much more reliable web development process
• With new customizations, it is achievable to establish a much more interactive internet site with minimal efforts
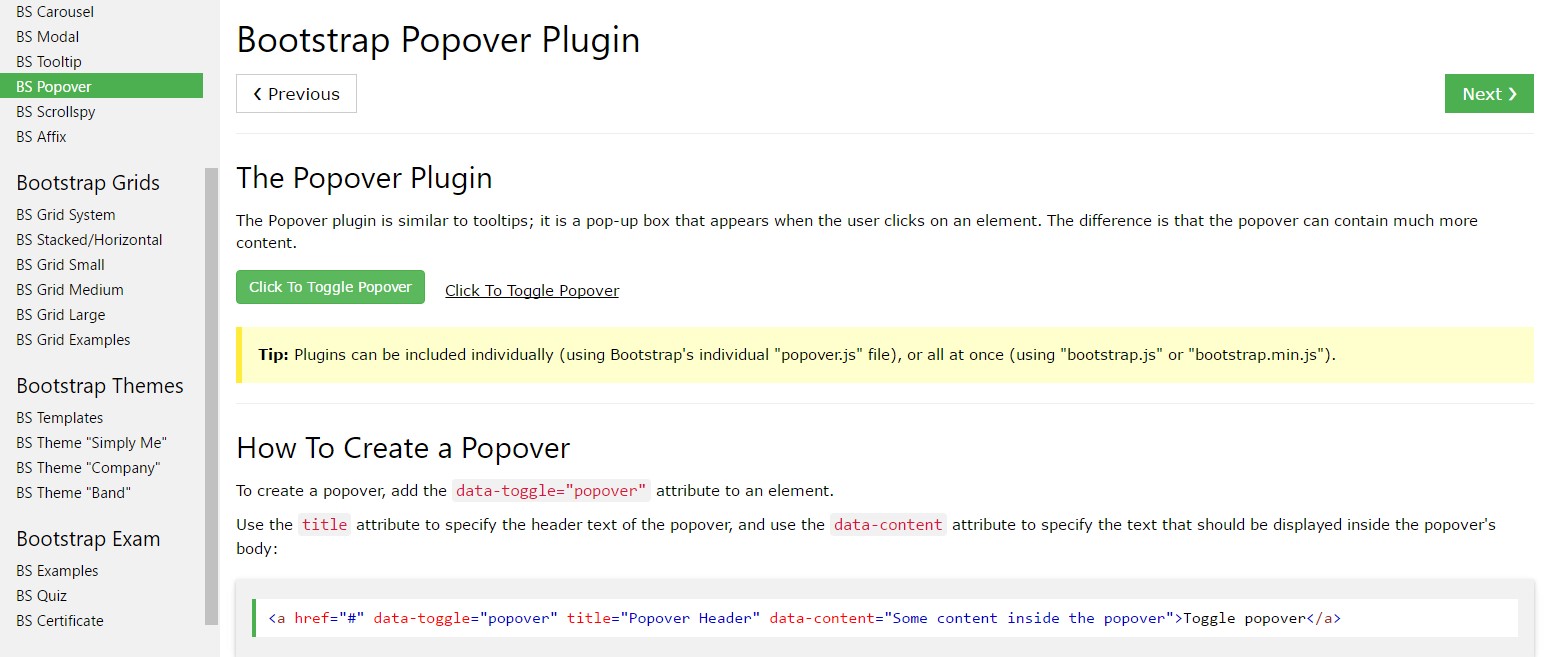
Bootstrap Popover Placement
And right now let us go to the major subject.
Assuming that you desire to add various backup data on your website you can put into action popovers - simply just bring in little overlay content.
How to apply the popover plugin:
- Bootstrap Popover Form rely at the Third side library Tether for placing. You need to utilize tether.min.js before bootstrap.js needed for popovers to run!
- Popovers demand the tooltip plugin being a dependency .
- Popovers are opt-in for effectiveness factors, so that you must activate them by yourself.
- Zero-length
titlecontent- Define
container:'body'- Producing popovers on hidden elements will never do the job.
- Whenever triggered from hyperlinks that span several lines, popovers are going to be centralized. Work with
white-space: nowrap;<a>Did you found out? Excellent, let's view specifically how they do the job with some scenarios. ( more hints)
You need to include tether.min.js just before bootstrap.js needed for popovers to operate!
Example: Implement popovers everywhere
One approach to initialize each of popovers in a webpage would undoubtedly be to pick out all of them by their
data-toggle$(function ()
$('[data-toggle="popover"]').popover()
)As an example: Applying the container feature
Whenever you possess several designs on a parent feature that conflict with a popover, you'll like to specify a custom
container$(function ()
$('.example-popover').popover(
container: 'body'
)
)Static popover
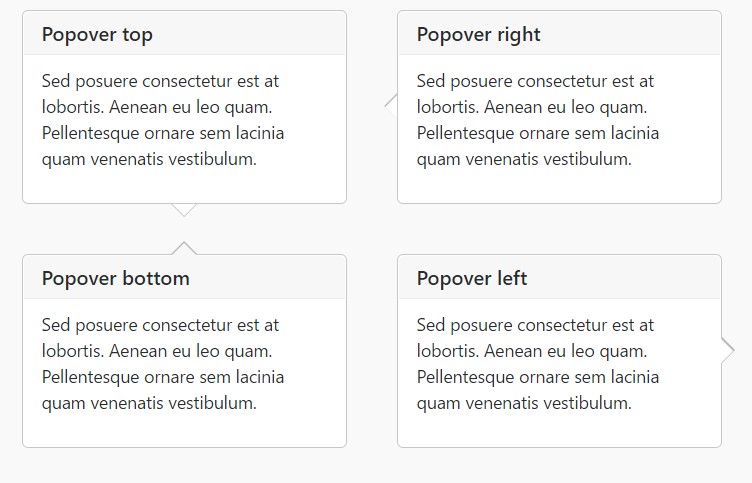
Four opportunities are available: high point, right, lowest part, and left straightened.
Live demonstration
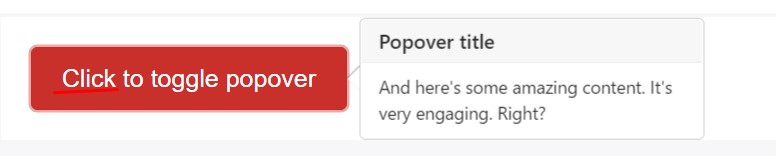
<button type="button" class="btn btn-lg btn-danger" data-toggle="popover" title="Popover title" data-content="And here's some amazing content. It's very engaging. Right?">Click to toggle popover</button>Four orientations
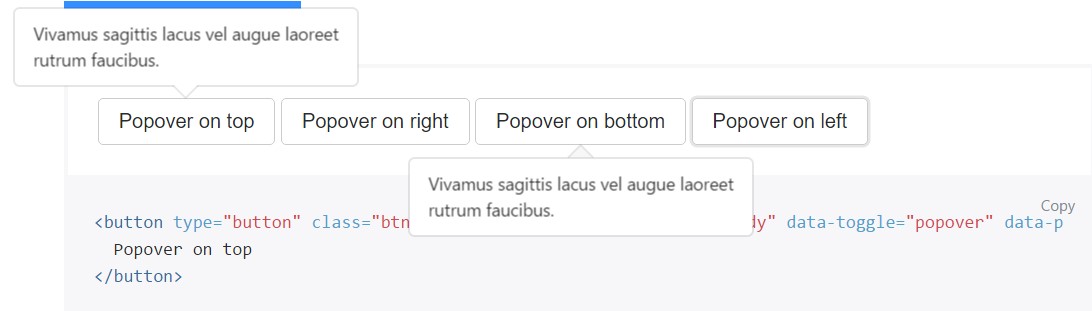
<button type="button" class="btn btn-secondary" data-container="body" data-toggle="popover" data-placement="top" data-content="Vivamus sagittis lacus vel augue laoreet rutrum faucibus.">
  Popover on top
</button>

<button type="button" class="btn btn-secondary" data-container="body" data-toggle="popover" data-placement="right" data-content="Vivamus sagittis lacus vel augue laoreet rutrum faucibus.">
  Popover on right
</button>

<button type="button" class="btn btn-secondary" data-container="body" data-toggle="popover" data-placement="bottom" data-content="Vivamus
sagittis lacus vel augue laoreet rutrum faucibus.">
  Popover on bottom
</button>

<button type="button" class="btn btn-secondary" data-container="body" data-toggle="popover" data-placement="left" data-content="Vivamus sagittis lacus vel augue laoreet rutrum faucibus.">
  Popover on left
</button>
Dismiss upon next mouse click
Utilize the
focusSpecialised markup expected for dismiss-on-next-click
For correct cross-browser and cross-platform behaviour, you need to work with the
<a><button>tabindex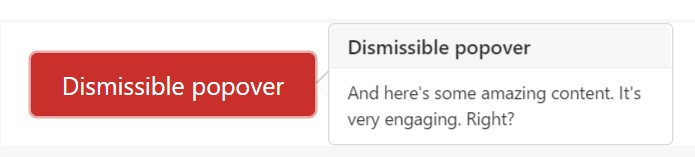
<a tabindex="0" class="btn btn-lg btn-danger" role="button" data-toggle="popover" data-trigger="focus" title="Dismissible popover" data-content="And here's some amazing content. It's very engaging. Right?">Dismissible popover</a>$('.popover-dismiss').popover(
trigger: 'focus'
)Application
Set up popovers via JavaScript
$('#example').popover(options)Features
Options may be pass on by using data attributes or else JavaScript. For data attributes, append the option name to
data-data-animation=""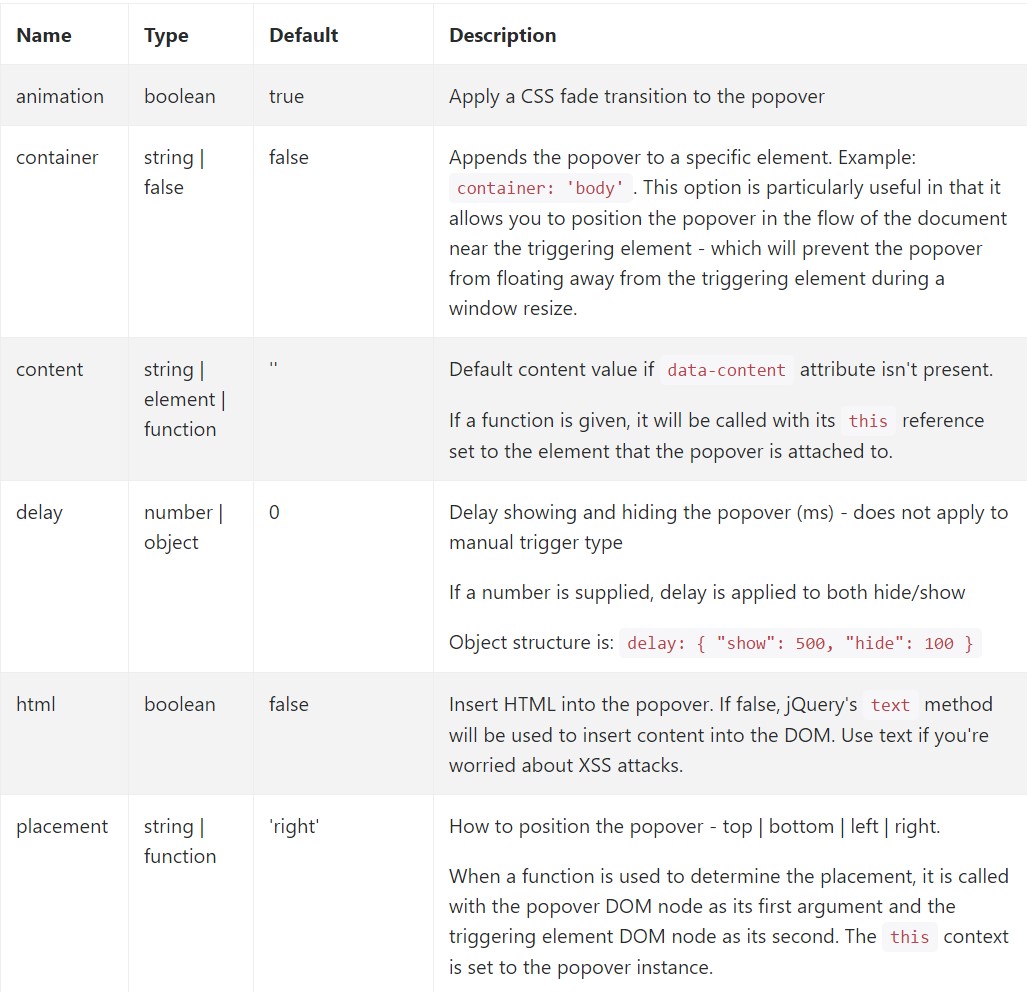
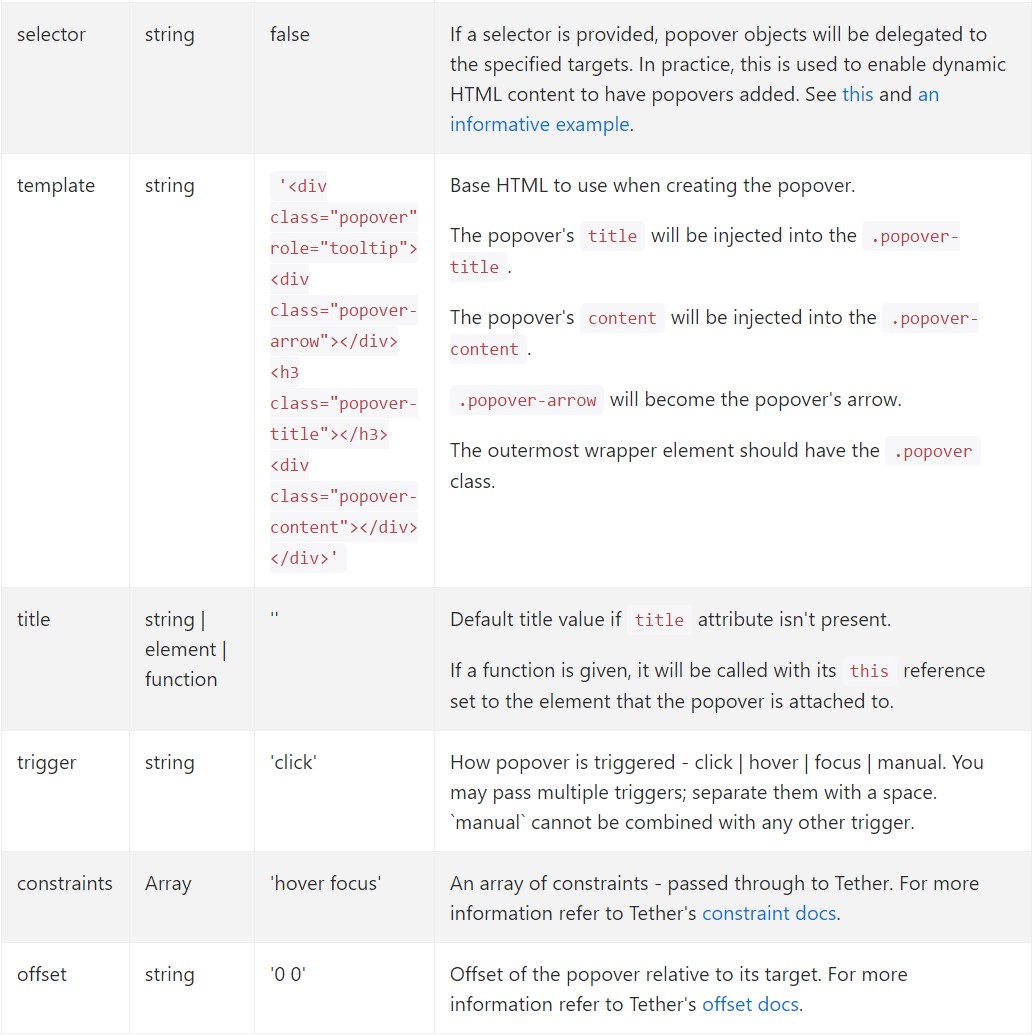
Data attributes for different popovers
Selections for particular popovers can additionally be indicated throughout the use of data attributes, as described above.
Options
$().popover(options)
Initializes popovers with regard to the component selection.
.popover('show')
Shows an element's popover. Go back to the caller just before the popover has really been displayed (i.e. before the shown.bs.popover
event takes place). This is regarded as a "manual" triggering of the popover. Popovers whose both the title and web content are zero-length are never shown.
$('#element').popover('show')
.popover('hide')
Disguises an element's popover. Come back to the caller right before the popover has actually been concealed (i.e. just before the hidden.bs.popover
activity happens). This is looked at a "manual" triggering of the popover.
$('#element').popover('hide')
.popover('toggle')
Button an element's popover. Goes back to the user right before the popover has truly been presented or concealed (i.e. prior to the shown.bs.popover
or hidden.bs.popover
event occurs). This is regarded a "manual" triggering of the popover.
$('#element').popover('toggle')
.popover('dispose')
Hides and gets rid of an element's popover. Popovers which use delegation ( that are developed making use of the selector possibility) can not be personally eliminated on descendant trigger elements.
$('#element').popover('dispose')
Events
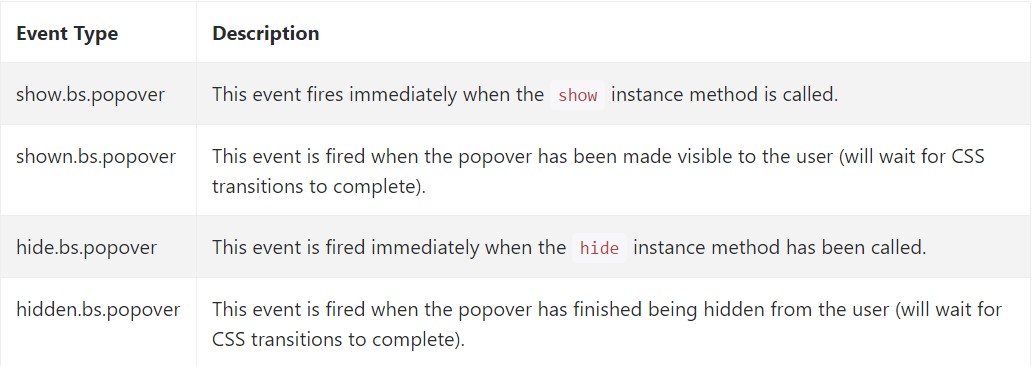
$('#myPopover').on('hidden.bs.popover', function ()
  // do something…
)
Check out several online video guides about Bootstrap popovers
Connected topics:
Bootstrap popovers approved records
Bootstrap popovers information
Bootstrap Popover difficulty
$().popover(options)
Initializes popovers with regard to the component selection.
$().popover(options).popover('show')
Shows an element's popover. Go back to the caller just before the popover has really been displayed (i.e. before the .popover('show')shown.bs.popover$('#element').popover('show').popover('hide')
Disguises an element's popover. Come back to the caller right before the popover has actually been concealed (i.e. just before the .popover('hide')hidden.bs.popover$('#element').popover('hide').popover('toggle')
Button an element's popover. Goes back to the user right before the popover has truly been presented or concealed (i.e. prior to the .popover('toggle')shown.bs.popoverhidden.bs.popover$('#element').popover('toggle').popover('dispose')
Hides and gets rid of an element's popover. Popovers which use delegation ( that are developed making use of the selector possibility) can not be personally eliminated on descendant trigger elements.
.popover('dispose')$('#element').popover('dispose')Events
$('#myPopover').on('hidden.bs.popover', function ()
// do something…
)Check out several online video guides about Bootstrap popovers
Connected topics:
Bootstrap popovers approved records
Bootstrap popovers information
Bootstrap Popover difficulty