Bootstrap Checkbox Example
Introduction
In some cases the most basic details might become extremely important-- most especially in case you get to need them. For example exactly how do your website visitors interact with the web pages you generate specifying a simple Boolean act-- just yes or no regarding some of the questions you want to ask, precisely how they do agree to the terms and conditions or else line up a few of the feasible preferences they might possess. We commonly get past this without paying a lot of an recognition to the feature accountable for these types of actions yet the Bootstrap Checkbox Toggle is really a quite serious element-- one our forms cannot in fact do without.
Inside newest fourth version of the Bootstrap platform we are provided with the
.form-check.form-check-label<div>.form-check.form-check-label<label><input>.form-check-inputExactly how to put into action the Bootstrap checkbox:
Bootstrap's
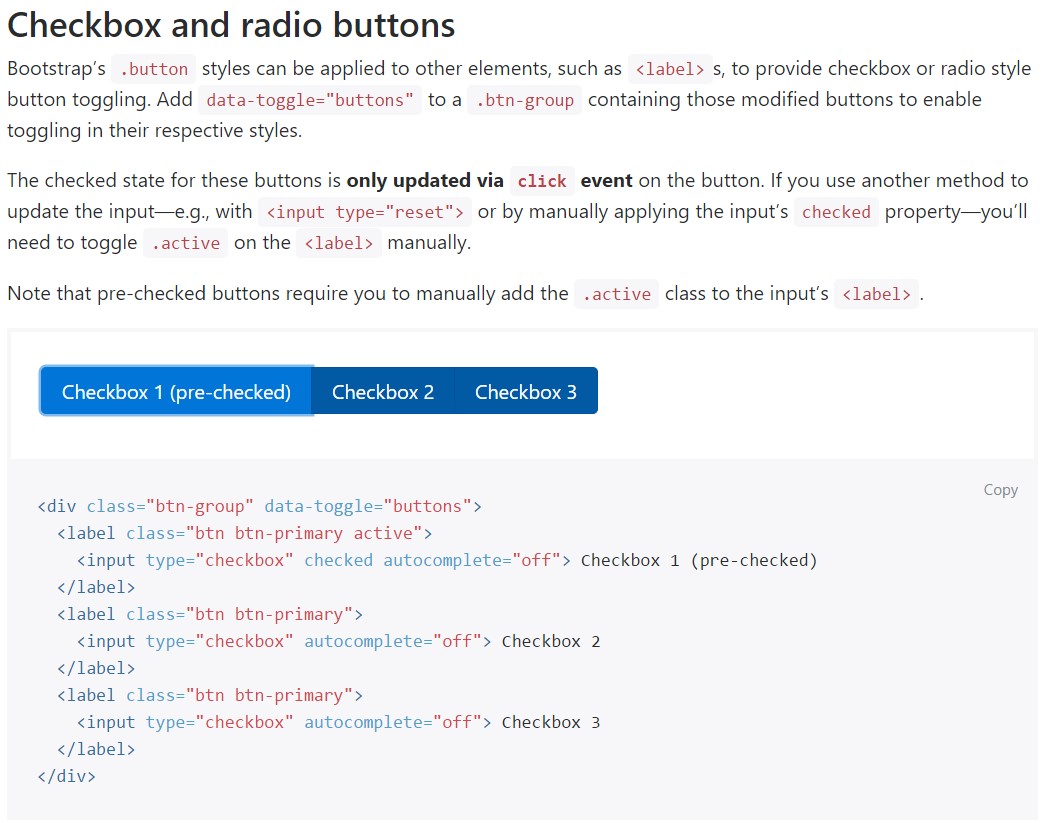
.button<label>data-toggle=" buttons".btn-group<input type="reset">.active<label>
<div class="btn-group" data-toggle="buttons">
  <label class="btn btn-primary active">
    <input type="checkbox" checked autocomplete="off"> Checkbox 1 (pre-checked)
  </label>
  <label class="btn btn-primary">
    <input type="checkbox" autocomplete="off"> Checkbox 2
  </label>
  <label class="btn btn-primary">
    <input type="checkbox" autocomplete="off"> Checkbox 3
  </label>
</div>
Once in a while we want the checkboxes to come inside our forms without the customer truly having the opportunity to have any sort of activity selecting them-- that is simply where the disabled option appears in.
To disable properly a checkbox in Bootstrap 4 utilizing the typical HTML attribute
disabledIn case you like the concept and actually desire to carry this out you have to assign the
.disabled.form-checkOne other case
If utilizing checkboxes, wrap them in a
<label>.custom-control.custom-checkboxUtilize
.custom-control-input<input>Additionally work with two
<span>.custom-control-indicator.custom-control-description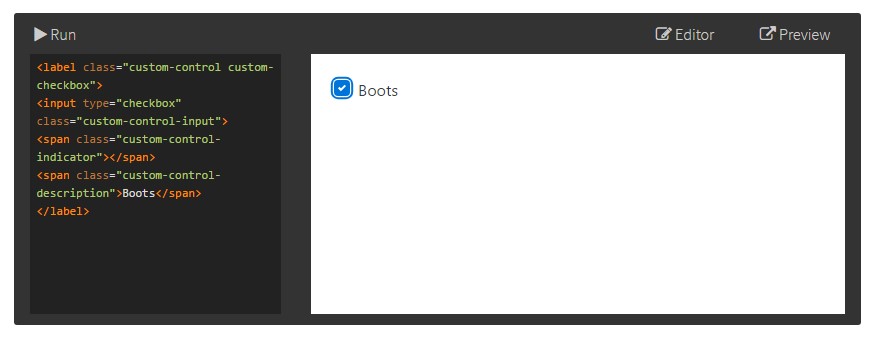
<label class="custom-control custom-checkbox">
<input type="checkbox" class="custom-control-input">
<span class="custom-control-indicator"></span>
<span class="custom-control-description">Boots</span>
</label>
Bootstrap Checkbox Button forms
Default checkboxes and radios are improved upon with the support of
.form-checkThe disabled class is going to at the same time light up the text coloration to help specify the input's state.
A brand new component for the Bootstrap edition 4 framework is the release of the so called custom-made form components. These are actually the very same components we are knowing within practicality however designated much more eye-catching and with the Bootstrap way. Using them you can certainly incorporate special spice and charm to your material through simply appointing a number of additional classes to the controls you provide in your forms.
For you to operate customized checkboxes wrap them inside a
<label>.custom-control.custom-checkbox<input>.custom-control-input<span>.custom-control-indicator.custom-control-descriptionFinal thoughts
That's pretty much all you must handle in order to bring in a checkbox component inside your Bootstrap 4 powered site and put in a number of custom made flavor to it bring in it a stylish appearances. And now all you ought to do is repeat the exercise unless you've reviewed every one of the checkboxes desired are actually on the webpage.
Look at a number of video clip tutorials relating to Bootstrap checkbox
Related topics:
Bootstrap checkbox main information
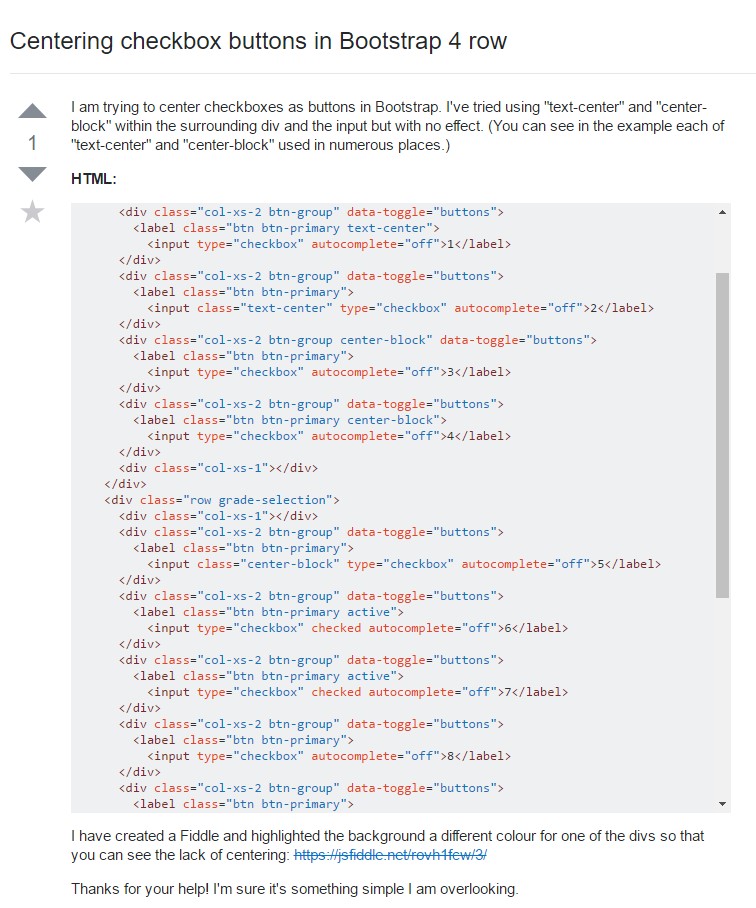
Centering checkbox buttons in Bootstrap 4 row
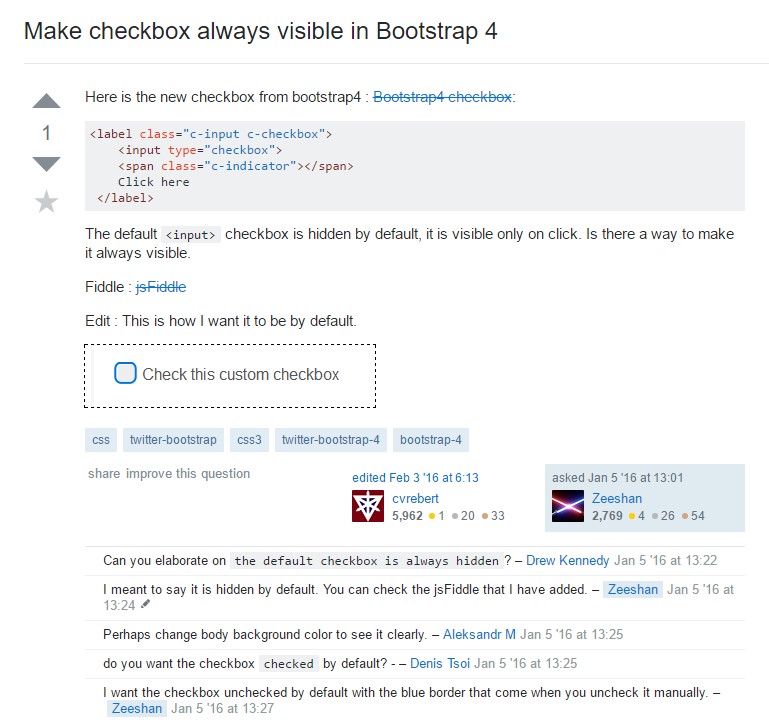
Make checkbox always visible in Bootstrap 4